-Need ruler, pencil, triangle
1. Review homework
a. You experimented with an anonymous expressive face-- trying only to capture the expressive nature of a face, in its simplest form. We used Matisse's process, and end up with as few lines as possible, which you then transferred to a clean page and finished with any medium you wished (ink, pencil, charcoal, etc.)
2. Cubes and 2-point perspective:
 2-point perspective is one way of drawing objects in 3D. The cube drawn with two vanishing points looks as if the sides are slowly fading away into the distance.

c. Focal length refers to how far apart your vanishing points are:

3. How to draw a house


1. Review homework
a. You experimented with an anonymous expressive face-- trying only to capture the expressive nature of a face, in its simplest form. We used Matisse's process, and end up with as few lines as possible, which you then transferred to a clean page and finished with any medium you wished (ink, pencil, charcoal, etc.)
2. Cubes and 2-point perspective:
1) First mark a horizon line 3/4's up on the paper, with vanishing points on each side (VP).
Then draw one edge of the cube beneath and perpendicular to the horizon line, and centered between the vanishing points.
2) Draw faint lines from each end of the first edge of the cube to the vanishing points.
Draw two more edges of the cube so that two sides of the cube can be clearly seen.
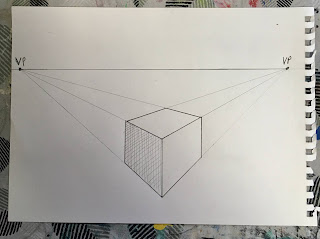
3) To add the top of the cube, draw two more faint guidelines from the top most edges of the sides to either vanishing point.
Shade in the dark side of the cube to give it dimension.
c. Focal length refers to how far apart your vanishing points are:
1) Normal focal length has a good distance between VP’s and will create minimal distortion.
2) When the VP's are close, as they are on this cube, you will have a wide-angle focal length, creating a very sharp angle. This setup is great for showing as much information as possible and making something seem very important and dynamic. Even though the human eye sees at a wide-angle focal length, this setup should be used sparingly.
3. How to draw a house
a. Start with a low horizon line (because you don't usually look down on a house from above), and put the vanishing points as far as possible away from the center (somewhere off the paper).
Draw the first edge of a cube beneath and perpendicular to the horizon line, just like you did before.
b. Complete the first two sides of your cube, just like you did before.

c. Now draw in the unseen back side of the cube (this is the part we had trouble with)... copy at the pink dotted lines, going to the VP's.
d. Mark an x through the front and back sides, and then a vertical line straight up through the middle of the x (perpendicular to the walls).
e. Add lines from your VP's to create the top and overhang of the roof

Comments
Post a Comment